1.环境准备
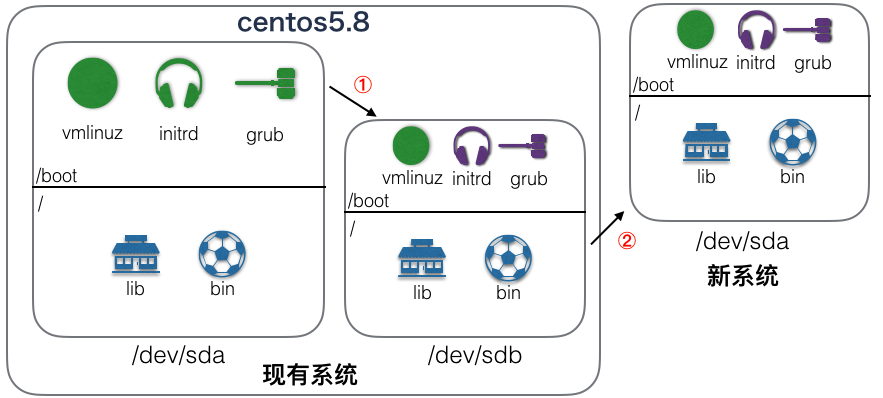
准备一个centos5.8的虚拟机,内存1G或者更多,硬盘两块,一块作为本地操作系统,另一块 为新系统准备。
准备一个新的虚拟机,使用centos5.8虚拟机中的另一块磁盘。
同时只启动这两台虚拟机中的一台。
[root@centos501 ~]# uname -a
Linux centos501 2.6.18-308.el5 #1 SMP Tue Feb 21 20:06:06 EST 2012 x86_64 x86_64
x86_64 GNU/Linux
[root@centos501 ~]# cat /etc/redhat-release
CentOS release 5.8 (Final)
# 多准备一个磁盘
[root@centos501 ~]# fdisk -l

Disk /dev/sda: 21.4 GB, 21474836480 bytes
255 heads, 63 sectors/track, 2610 cylinders
Units = cylinders of 16065 * 512 = 8225280 bytes

   Device Boot      Start         End      Blocks   Id  System
/dev/sda1   *           1          13      104391   83  Linux
/dev/sda2              14        2610    20860402+  83  Linux

Disk /dev/sdb: 10.7 GB, 10737418240 bytes
255 heads, 63 sectors/track, 1305 cylinders
Units = cylinders of 16065 * 512 = 8225280 bytes

Disk /dev/sdb doesn't contain a valid partition table
2.制作过程
主要制作过程如下图所示:
2.1 grub
# 先分区
[root@centos501 ~]# fdisk -l /dev/sdb

Disk /dev/sdb: 10.7 GB, 10737418240 bytes
255 heads, 63 sectors/track, 1305 cylinders
Units = cylinders of 16065 * 512 = 8225280 bytes

   Device Boot      Start         End      Blocks   Id  System
/dev/sdb1               1          13      104391   83  Linux
/dev/sdb2              14        1305    10377990   83  Linux
[root@centos501 ~]# mkfs.ext3 /dev/sdb1
[root@centos501 ~]# mkfs.ext3 /dev/sdb2
[root@centos501 ~]# mkdir /mylinux/{boot,sysroot} -pv
mkdir: created directory '/mylinux'
mkdir: created directory '/mylinux/boot'
mkdir: created directory '/mylinux/sysroot'
[root@centos501 ~]# mount /dev/sdb1 /mylinux/boot/
[root@centos501 ~]# mount /dev/sdb2 /mylinux/sysroot/

# 开始制作grub
[root@centos501 ~]# grub-install --root-directory=/mylinux /dev/sdb
Probing devices to guess BIOS drives. This may take a long time.
Installation finished. No error reported.
This is the contents of the device map /mylinux/boot/grub/device.map.
Check if this is correct or not. If any of the lines is incorrect,
fix it and re-run the script 'grub-install'.

(fd0)   /dev/fd0
(hd0)   /dev/sda
(hd1)   /dev/sdb
[root@centos501 ~]# ls -l /mylinux/boot/
total 14
drwxr-xr-x 2 root root  1024 Jul  1 19:30 grub
drwx------ 2 root root 12288 Jul  1 19:28 lost+found
2.2 内核vmlinuz
[root@centos501 ~]# cp /boot/vmlinuz-2.6.18-308.el5 /mylinux/boot/vmlinuz
2.3 initrd
[root@centos501 ~]# mkdir /tmp/test
[root@centos501 ~]# cd /tmp/test/
[root@centos501 test]# zcat /boot/initrd-2.6.18-308.el5.img |cpio -id
14113 blocks
[root@centos501 test]# ls
bin  dev  etc  init  lib  proc  sbin  sys  sysroot
# 修改一下根目录启动位置,这里现有系统和新系统的位置是一样的,因此
# 不需要进行修改
[root@centos501 test]# cat init |grep /dev/sda2
mkrootdev -t ext3 -o defaults,ro /dev/sda2
# 重新再压缩好
[root@centos501 test]# find . | cpio -H newc --quiet -o |gzip -9 >
/mylinux/boot/initrd.img
[root@centos501 test]# ls /mylinux/boot/
grub  initrd.img  lost+found  vmlinuz
2.4 修改grub配置文件
[root@centos501 ~]# vim /mylinux/boot/grub/grub.conf
[root@centos501 ~]# cat /mylinux/boot/grub/grub.conf
default=0
timeout=5
title Mylinux
        root (hd0,0)
        kernel /vmlinuz
        initrd /initrd.img
2.5 创建根目录
[root@centos501 sysroot]# mkdir bin boot dev etc/rc.d home lib lib64 proc root
sbin sys tmp usr/{bin,sbin} var/log -p
[root@centos501 sysroot]# tree
.
|-- bin
|-- boot
|-- dev
|-- etc
|   `-- rc.d
|-- home
|-- lib
|-- lib64
|-- lost+found
|-- proc
|-- root
|-- sbin
|-- sys
|-- tmp
|-- usr
|   |-- bin
|   `-- sbin
`-- var
    `-- log

19 directories, 0 files`


# 至少需要两个进程
[root@centos501 sysroot]# cp /sbin/init sbin/
[root@centos501 sysroot]# cp /bin/bash bin/

# 拷贝 init需要的库
[root@centos501 sysroot]# ldd /sbin/init
        linux-vdso.so.1 =>  (0x00007ffffebfd000)
        libsepol.so.1 => /lib64/libsepol.so.1 (0x00002b274f3b1000)
        libselinux.so.1 => /lib64/libselinux.so.1 (0x00002b274f5f7000)
        libc.so.6 => /lib64/libc.so.6 (0x00002b274f80f000)
        libdl.so.2 => /lib64/libdl.so.2 (0x00002b274fb68000)
        /lib64/ld-linux-x86-64.so.2 (0x00002b274f193000)
[root@centos501 sysroot]# cp /lib64/libsepol.so.1 lib64/
[root@centos501 sysroot]# cp /lib64/libselinux.so.1 lib64/
[root@centos501 sysroot]# cp /lib64/libc.so.6 lib64/
[root@centos501 sysroot]# cp /lib64/libdl.so.2 lib64/
[root@centos501 sysroot]# cp /lib64/ld-linux-x86-64.so.2 lib64/

# 拷贝 bash 需要的库
[root@centos501 sysroot]# ldd /bin/bash
        linux-vdso.so.1 =>  (0x00007fff9f9fd000)
        libtermcap.so.2 => /lib64/libtermcap.so.2 (0x00002ba35562a000)
        libdl.so.2 => /lib64/libdl.so.2 (0x00002ba35582d000)
        libc.so.6 => /lib64/libc.so.6 (0x00002ba355a31000)
        /lib64/ld-linux-x86-64.so.2 (0x00002ba35540c000)
[root@centos501 sysroot]#
[root@centos501 sysroot]# cp /lib64/libtermcap.so.2 lib64/
[root@centos501 sysroot]# cp /lib64/libdl.so.2 lib64/
cp: overwrite 'lib64/libdl.so.2'?
[root@centos501 sysroot]# cp /lib64/libc.so.6 lib64/
cp: overwrite 'lib64/libc.so.6'?
[root@centos501 sysroot]# cp /lib64/ld-linux-x86-64.so.2 lib64/
cp: overwrite 'lib64/ld-linux-x86-64.so.2'?

# 用chroot测试一下
[root@centos501 sysroot]# chroot /mylinux/sysroot/
bash-3.2# pwd
/
bash-3.2# ls
bash: ls: command not found
bash-3.2# exit
exit
[root@centos501 sysroot]#
2.6 配置inittab文件
[root@centos501 sysroot]# vim etc/inittab
[root@centos501 sysroot]# cat etc/inittab
id:3:initdefault:
si::sysinit:/etc/rc.d/rc.sysinit
[root@centos501 sysroot]# vim etc/rc.d/rc.sysinit
[root@centos501 sysroot]# cat etc/rc.d/rc.sysinit
#!/bin/bash
echo -e "\t Welcome to Mylinux..."
/bin/bash
[root@centos501 sysroot]# chmod +x etc/rc.d/rc.sysinit
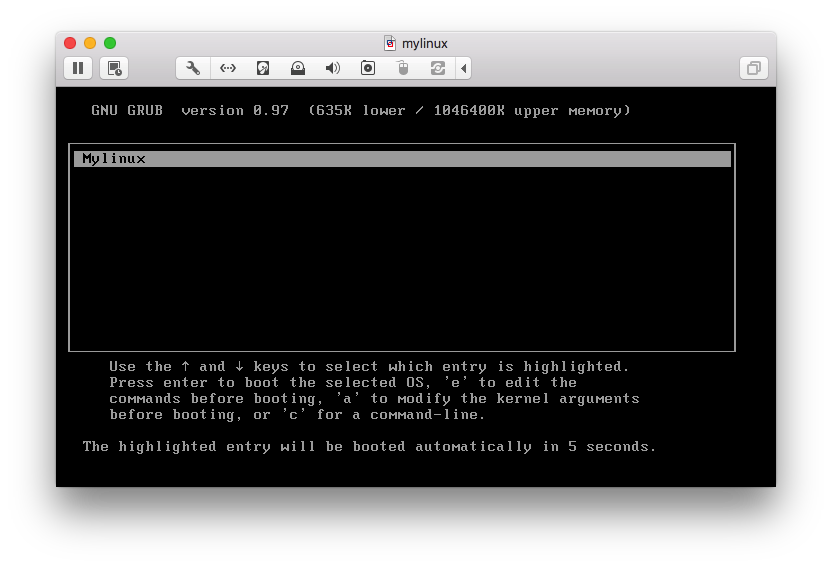
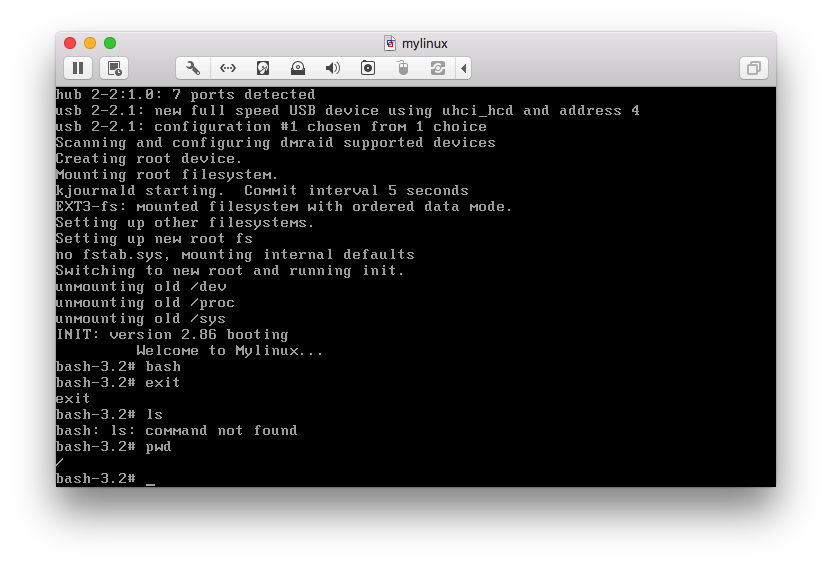
2.7 测试
新建虚拟机,使用sdb这个硬盘,启动
3.实现简单的关机和重启
3.1 复制二进制命令和库文件的脚本
以后会需要很多命令的使用,不能每次都使用cp来进行复制,应该编写一个脚本用来复制 这些二进制命令和库文件,这里是一个参考脚本,来自互联网。
[root@centos501 sysroot]# cat /usr/local/bin/cpcommand.sh
#!/bin/bash
DEST=/mylinux/sysroot
libcp() {
LIBPATH=${1%/*}
[ ! -d $DEST$LIBPATH ] && mkdir -p $DEST$LIBPATH
[ ! -e $DEST${1} ] && cp $1 $DEST$LIBPATH && echo "copy lib $1 finished."
}


bincp() {
CMDPATH=${1%/*}
[ ! -d $DEST$CMDPATH ] && mkdir -p $DEST$CMDPATH
[ ! -e $DEST${1} ] && cp $1 $DEST$CMDPATH

for LIB in `ldd $1 | grep -o "/.*lib\(64\)\{0,1\}/[^[:space:]]\{1,\}"`;
do libcp $LIB
done
}


read -p "Your command: " CMD
until [ $CMD == 'q' ]; do
! which $CMD &> /dev/null && echo "Wrong command" && read -p "Input again:" CMD
&& continue
COMMAND=` which $CMD | grep -v "^alias" | grep -o "[^[:space:]]\{1,\}"`
bincp $COMMAND
echo "copy $COMMAND finished."
read -p "Continue: " CMD
done
使用方法:
[root@centos501 sysroot]# cpcommand.sh
Your command: reboo     reboot
copy /sbin/reboot finished.
Continue: halt
copy /sbin/halt finished.
Continue: sleep
copy /bin/sleep finished.
Continue: sync
copy /bin/sync finished.
Continue: q
3.2 简单的关机和重启
来看一下现有系统的inittab文件,里面有一部分内容是:
l0:0:wait:/etc/rc.d/rc 0
l1:1:wait:/etc/rc.d/rc 1
l2:2:wait:/etc/rc.d/rc 2
l3:3:wait:/etc/rc.d/rc 3
l4:4:wait:/etc/rc.d/rc 4
l5:5:wait:/etc/rc.d/rc 5
l6:6:wait:/etc/rc.d/rc 6
表示的是在切换到该运行级别的时候,将会运行相应的脚本,比如,切换到0
就会运行/etc/rc.d/rc 0这段代码。我们可以自定义这段脚本来实现我们自己的功能。
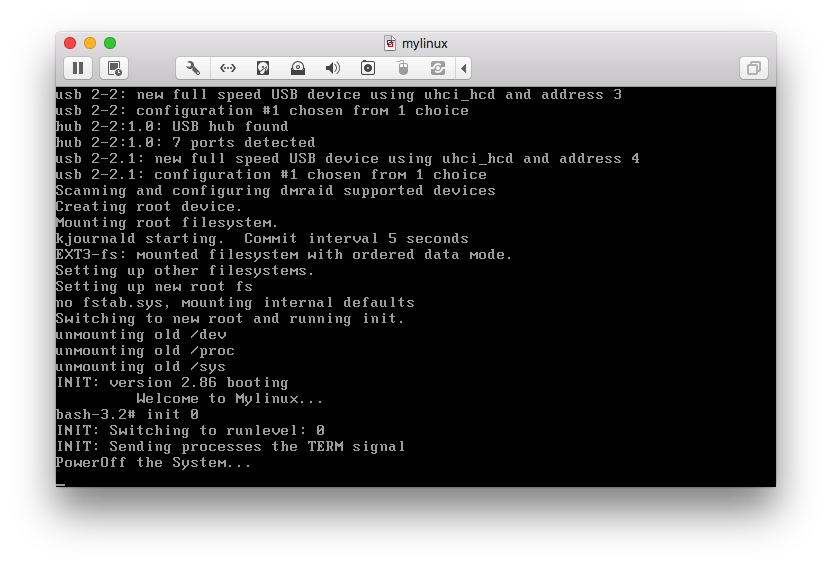
那么我们这里就编写一个自己的rc脚本,来实现关机和重启。如下:
[root@centos501 sysroot]# cat etc/rc.d/rc
#!/bin/bash

poweroff() {
        sync
        sleep 1
        sync

        echo -e "PowerOff the System..."
        exec /sbin/halt -p
}
sysreboot() {
        sync
        sleep 1
        sync

        echo -e "Rebooting the System..."
        exec /sbin/reboot
}

case $1 in
0)
        poweroff;;
6)
        sysreboot;;
*)
        echo "init 0 and 6 aviliable"
        ;;
esac
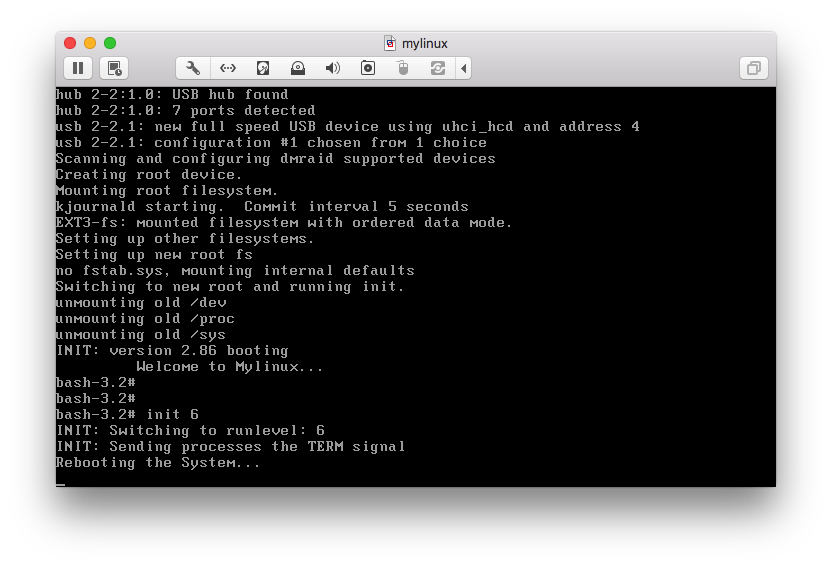
脚本很简单,就实现两个运行级别,0表示关机,使用halt -p 命令实现;6级别表示重启, 使用reboot来实现。 然后只需要将中间用到的命令通过脚本复制到自制的系统文件夹中即可。
[root@centos501 sysroot]# cpcommand.sh
Your command: halt
copy /sbin/halt finished.
Continue: sync
copy /bin/sync finished.
Continue: reboot
copy /sbin/reboot finished.
Continue: q
[root@centos501 sysroot]# chmod +x etc/rc.d/rc
3.3 测试一下
4 识别网卡
在新虚拟机中增加一块网卡,因为使用的是和centos5.8一样的网卡,因此应该使用和现有 系统一样的网卡驱动。在现有系统中查看网卡驱动:
# 使用e1000
[root@centos501 ~]# dmesg |grep -i eth0
e1000: eth0: e1000_probe: Intel(R) PRO/1000 Network Connection
e1000: eth0 NIC Link is Up 1000 Mbps Full Duplex, Flow Control: None
8021q: adding VLAN 0 to HW filter on device eth0
# 而且也没有依赖
[root@centos501 ~]# lsmod |grep e1000
e1000                 162665  0
# 查看驱动的位置
[root@centos501 ~]# modinfo e1000
filename:       /lib/modules/2.6.18-308.el5/kernel/drivers/net/e1000/e1000.ko
...
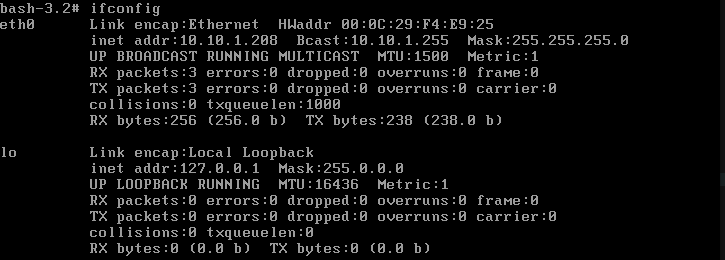
将网卡驱动复制到新系统中,并添加到内核,同时为网卡配置IP地址
[root@centos501 sysroot]# mkdir lib/modeules
[root@centos501 sysroot]# mkdir cp
/lib/modules/2.6.18-308.el5/kernel/drivers/net/e1000/e1000.ko lib/modules/
[root@centos501 sysroot]# tree lib/
lib/
`-- modules
    `-- e1000.ko

1 directory, 1 file
[root@centos501 sysroot]# vi etc/rc.d/rc.sysinit
#!/bin/bash
echo -e "\t Welcome to Mylinux..."

/bin/hostname localhost

echo -e "initializing network device..."
/sbin/insmod /lib/modules/e1000.ko
/sbin/ifconfig eth0 10.10.1.208/24
/sbin/ifconfig lo 127.0.0.1/8

/bin/bash
测试一下

参考资料
- http://www.91linux.com/html/2017/CentOS_0320/42598.html
- …