0. xcat简介
xcat官方文档中说明: xCAT enables the administrator to:
- Discover the hardware servers
- Execute remote system management
- Provision operating systems on physical or virtual machines
- Provision machines in Diskful (stateful) and Diskless (stateless)
- Install and configure user applications
- Parallel system management
- Integrate xCAT in Cloud
Github地址:https://github.com/xcat2/xcat-core/
xCat拓扑:
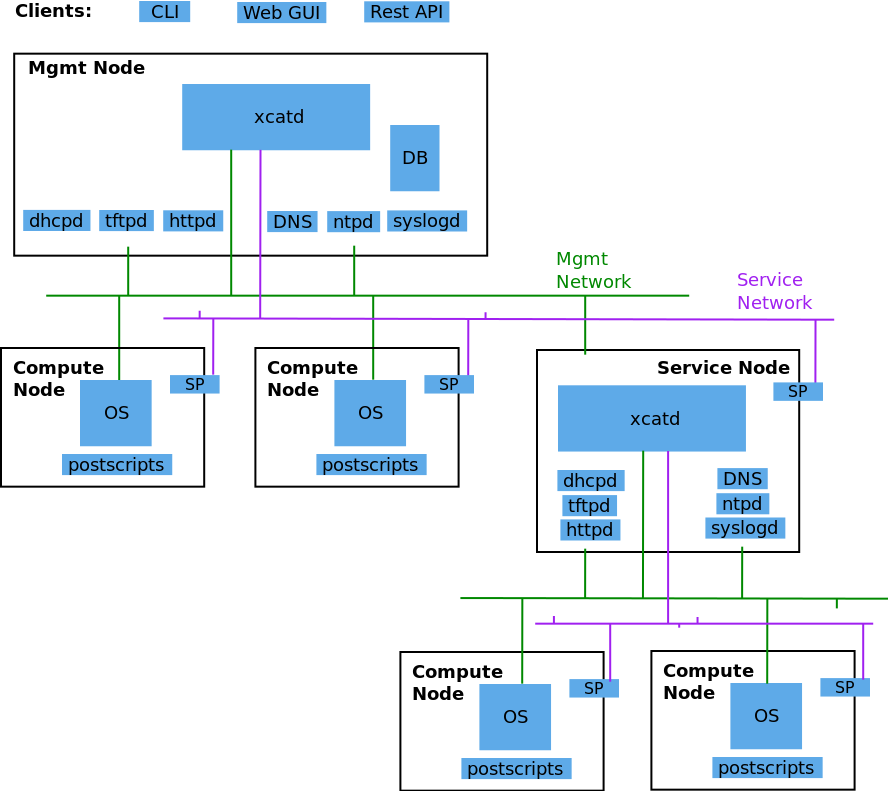
节点类型:
- xcat管理节点(managementNode):xcat主要管理节点
- 服务节点(serviceNode):如果管理的节点很多,可以减少管理管理节点负担;
- 计算节点(computeNode):应用节点
网络类型:
- 管理网络(mgmtNetwork):所有节点之间的连接;
- 服务网络(serviceNetwork):SP之间连接,其中管理节点需要使用一个操作系统网卡进行连接;
- 应用网络(applicationNetwork):计算节点之间通信;
其他:
- 网络服务:dhcp,tftp,http等
- SP:硬件管理,如Integrated Management Module (IMM), Flexible Service Processor (FSP), Baseboard Management Controller (BMC)
- RestAPIs:对外API;
0.1 快速安装手册
可以按照下面的几个步骤:
- 找一个mgtNode服务器,集群越大,配置要求越高,都是废话;
- 安装xcat管理节点
- 启动xcat管理节点
- 发现目标节点,小集群可以手动收集信息,然后mkdef来定义;大集群可以自动发现,使用lsdef发现;
- 可以对目标节点进行硬件操作,比如开关机之类的;
- 目标节点部署操作系统;
- 升级操作系统:安装软件、同步文件、执行脚本等;
- 执行并行命令
0.2 操作系统和硬件支持列表
| – | Power | Power LE | zVM | Power KVM | x86_64 | x86_64 KVM | x86_64 Esxi |
|---|---|---|---|---|---|---|---|
| RHEL | yes | yes | yes | yes | yes | yes | yes |
| SLES | yes | yes | yes | yes | yes | yes | yes |
| Ubuntu | no | yes | no | yes | yes | yes | yes |
| CentOS | no | no | no | no | yes | yes | yes |
| AIX | yes | no | no | no | no | no | no |
| Windows | no | no | no | no | yes | yes | yes |
1. 安装测试
三个虚拟机,一个xcat管理节点,两个compute节点。注意关闭虚拟网络中的dhcp服务,以免相互冲突。
/etc/hosts
[root@xcatmn ~]# vim /etc/hosts
[root@xcatmn ~]# cat /etc/hosts
127.0.0.1   localhost localhost.localdomain localhost4 localhost4.localdomain4
::1         localhost localhost.localdomain localhost6 localhost6.localdomain6

192.168.56.130 xcatmn
192.168.56.131 cpt01
192.168.56.132 cpt02
selniux & iptables
[root@xcatmn ~]# vim /etc/selinux/config
[root@xcatmn ~]# cat /etc/selinux/config |grep SELINUX=
# SELINUX= can take one of these three values:
SELINUX=disabled
[root@xcatmn ~]# service iptables stop
[root@xcatmn ~]# chkconfig iptables off
解压并创建本地rpeo
[root@xcatmn ~]# mkdir /install
[root@xcatmn ~]# mkdir /install/xcat2
[root@xcatmn ~]# mv xcat-
xcat-core-2.10.tar.bz2         xcat-dep-201506110324.tar.bz2
[root@xcatmn ~]# mv xcat-* /install/xcat2/
[root@xcatmn ~]# cd /install/xcat2/
[root@xcatmn xcat2]# ls
xcat-core-2.10.tar.bz2  xcat-dep-201506110324.tar.bz2
[root@xcatmn xcat2]# tar -jvxf xcat-core-2.10.tar.bz2
...
[root@xcatmn xcat2]# ls
xcat-core  xcat-core-2.10.tar.bz2  xcat-dep-201506110324.tar.bz2
[root@xcatmn xcat2]# cd xcat-core
[root@xcatmn xcat-core]# ls
mklocalrepo.sh                              xCAT-buildkit-2.10-snap201507240527.noarch.rpm                xCATsn-2.10-snap201507240527.ppc64le.rpm
perl-xCAT-2.10-snap201507240527.noarch.rpm  xCAT-client-2.10-snap201507240527.noarch.rpm                  xCATsn-2.10-snap201507240527.ppc64.rpm
repodata                                    xCAT-confluent-2.10-snap201507240527.noarch.rpm               xCATsn-2.10-snap201507240527.s390x.rpm
xCAT-2.10-snap201507240527.ppc64le.rpm      xCAT-core.repo                                                xCATsn-2.10-snap201507240527.x86_64.rpm
xCAT-2.10-snap201507240527.ppc64.rpm        xCAT-genesis-scripts-ppc64-2.10-snap201507240527.noarch.rpm   xCAT-SoftLayer-2.10-snap201507240527.noarch.rpm
xCAT-2.10-snap201507240527.s390x.rpm        xCAT-genesis-scripts-x86_64-2.10-snap201507240527.noarch.rpm  xCAT-test-2.10-snap201507240527.noarch.rpm
xCAT-2.10-snap201507240527.x86_64.rpm       xCAT-server-2.10-snap201507240527.noarch.rpm                  xCAT-vlan-2.10-snap201507240527.noarch.rpm
[root@xcatmn xcat-core]# ./mklocalrepo.sh
/install/xcat2/xcat-core
[root@xcatmn xcat-core]# ls /etc/yum.repos.d/
redhat.repo  rhel-source.repo  xCAT-core.repo
[root@xcatmn xcat-core]# cd ..
[root@xcatmn xcat2]# ls
xcat-core  xcat-core-2.10.tar.bz2  xcat-dep-201506110324.tar.bz2
[root@xcatmn xcat2]# tar -jxvf xcat-dep-201506110324.tar.bz2
...
[root@xcatmn xcat2]# cd xcat-dep
[root@xcatmn xcat-dep]# cd rh6/x86_64/
[root@xcatmn x86_64]# ./mklocalrepo.sh
/install/xcat2/xcat-dep/rh6/x86_64
[root@xcatmn x86_64]# ls /etc/yum.repos.d/
redhat.repo  rhel-source.repo  xCAT-core.repo  xCAT-dep.repo
安装xcat
[root@xcatmn x86_64]# yum -y install xCAT
...

[root@xcatmn ~]# source /etc/profile.d/xcat.sh

# 验证安装情况
[root@xcatmn ~]# tabdump site
#key,value,comments,disable
"blademaxp","64",,
"fsptimeout","0",,
"installdir","/install",,
"ipmimaxp","64",,
"ipmiretries","3",,
"ipmitimeout","2",,
"consoleondemand","no",,
"master","192.168.56.130",,
"nameservers","192.168.56.130",,
"maxssh","8",,
"ppcmaxp","64",,
"ppcretry","3",,
"ppctimeout","0",,
"powerinterval","0",,
"syspowerinterval","0",,
"sharedtftp","1",,
"SNsyncfiledir","/var/xcat/syncfiles",,
"nodesyncfiledir","/var/xcat/node/syncfiles",,
"tftpdir","/tftpboot",,
"xcatdport","3001",,
"xcatiport","3002",,
"xcatconfdir","/etc/xcat",,
"timezone","PRC",,
"useNmapfromMN","no",,
"enableASMI","no",,
"db2installloc","/mntdb2",,
"databaseloc","/var/lib",,
"sshbetweennodes","ALLGROUPS",,
"dnshandler","ddns",,
"vsftp","n",,
"cleanupxcatpost","no",,
"dhcplease","43200",,
"auditnosyslog","0",,
"xcatsslversion","TLSv1",,
2.开始配置
修改networks表
[root@xcatmn ~]# chtab net=192.168.56.0 networks.dhcpserver=192.168.56.130
[root@xcatmn ~]# chtab net=192.168.56.0 networks.ntpservers=192.168.56.130
[root@xcatmn ~]# chtab net=192.168.56.0 networks.logservers=192.168.56.130
[root@xcatmn ~]# chtab net=192.168.56.0 networks.tftpserver=192.168.56.130
[root@xcatmn ~]# chtab net=192.168.56.0 networks.nameservers=192.168.56.130
[root@xcatmn ~]# tabdump networks
#netname,net,mask,mgtifname,gateway,dhcpserver,tftpserver,nameservers,ntpservers,logservers,dynamicrange,staticrange,staticrangeincrement,nodehostname,ddnsdomain,vlanid,domain,comments,disable
"192_168_56_0-255_255_255_0","192.168.56.0","255.255.255.0","eth0","<xcatmaster>","192.168.56.130","192.168.56.130","192.168.56.130","192.168.56.130","192.168.56.130",,,,,,,,,
[root@xcatmn ~]#
修改site表,makedns
[root@xcatmn ~]# chtab key=ntpservers site.value=192.168.56.130
[root@xcatmn ~]# rpm -qa|grep bind-chroot
[root@xcatmn ~]#
[root@xcatmn ~]# vim /etc/sysconfig/network
[root@xcatmn ~]# cat /etc/sysconfig/network
NETWORKING=yes
HOSTNAME=xcatmn
DOMAINNAME=f.com
[root@xcatmn ~]# echo "/bin/domainname f.com" >>/etc/rc.local
[root@xcatmn ~]# chtab key=domain site.value=f.com

[root@xcatmn ~]# makedns -n
Warning: SELINUX is not disabled. The makedns command will not be able to generate a complete DNS setup. Disable SELINUX and run the command again.
Handling cpt01 in /etc/hosts.
Handling localhost in /etc/hosts.
Handling cpt02 in /etc/hosts.
Handling xcatmn in /etc/hosts.
Handling localhost in /etc/hosts.
Getting reverse zones, this may take several minutes for a large cluster.
Completed getting reverse zones.
Updating zones.
Completed updating zones.
Restarting named
Restarting named complete
Updating DNS records, this may take several minutes for a large cluster.
Completed updating DNS records.
[root@xcatmn ~]# vim /etc/resolv.conf
[root@xcatmn ~]# service named restart
Stopping named: .                                          [  OK  ]
Starting named:                                            [  OK  ]
[root@xcatmn ~]# chkconfig named on
[root@xcatmn ~]# nslookup cpt01
Server:		192.168.56.130
Address:	192.168.56.130#53

Name:	cpt01.f.com
Address: 192.168.56.131
修改nodelist表
[root@xcatmn ~]# chtab node=cpt01 nodelist.groups=compute,all
[root@xcatmn ~]# chtab node=cpt02 nodelist.groups=compute,all
[root@xcatmn ~]# tabdump nodelist
#node,groups,status,statustime,appstatus,appstatustime,primarysn,hidden,updatestatus,updatestatustime,zonename,comments,disable
"cpt01","compute,all",,,,,,,,,,,
"cpt02","compute,all",,,,,,,,,,,
增加两个节点的mac地址
[root@xcatmn ~]# nodeadd cpt01 groups=compute,all mac.interface=eth0 hosts.ip=192.168.56.131 mac.mac=08:00:27:14:FB:04 nodehm.mgt=ipmi nodehm.power=ipmi
[root@xcatmn ~]# nodeadd cpt02 groups=compute,all mac.interface=eth0 hosts.ip=192.168.56.132 mac.mac=08:00:27:0A:4F:4A nodehm.mgt=ipmi nodehm.power=ipmi

[root@xcatmn ~]# tabdump mac
#node,interface,mac,comments,disable
"cpt01","eth0","08:00:27:14:FB:04",,
"cpt02","eth0","08:00:27:0A:4F:4A",,
修改hosts表
[root@xcatmn ~]# tabdump hosts
#node,ip,hostnames,otherinterfaces,comments,disable
"cpt01","192.168.56.131",,,,
"cpt02","192.168.56.132",,,,
[root@xcatmn ~]# makehosts
[root@xcatmn ~]# cat /etc/hosts
127.0.0.1   localhost localhost.localdomain localhost4 localhost4.localdomain4
::1         localhost localhost.localdomain localhost6 localhost6.localdomain6

192.168.56.130 xcatmn
192.168.56.131 cpt01 cpt01.f.com
192.168.56.132 cpt02 cpt02.f.com
makedhcp
[root@xcatmn ~]# makedhcp -n
Renamed existing dhcp configuration file to  /etc/dhcp/dhcpd.conf.xcatbak

The dhcp server must be restarted for OMAPI function to work
Warning: No dynamic range specified for 192.168.56.0. If hardware discovery is being used, a dynamic range is required.
[root@xcatmn ~]#
[root@xcatmn ~]# chkconfig dhcpd on
修改noderes表
[root@xcatmn ~]# chtab node=cpt01 noderes.netboot=pxe noderes.xcatmaster=192.168.56.130 noderes.installnic=eth0 noderes.primarynic=eth0 noderes.nfsserver=192.168.56.130
[root@xcatmn ~]# chtab node=cpt02 noderes.netboot=pxe noderes.xcatmaster=192.168.56.130 noderes.installnic=eth0 noderes.primarynic=eth0 noderes.nfsserver=192.168.56.130
[root@xcatmn ~]# tabdump noderes
#node,servicenode,netboot,tftpserver,tftpdir,nfsserver,monserver,nfsdir,installnic,primarynic,discoverynics,cmdinterface,xcatmaster,current_osimage,next_osimage,nimserver,routenames,nameservers,proxydhcp,comments,disable
"cpt01",,"pxe",,,"192.168.56.130",,,"eth0","eth0",,,"192.168.56.130",,,,,,,,
"cpt02",,"pxe",,,"192.168.56.130",,,"eth0","eth0",,,"192.168.56.130",,,,,,,,
修改nodetype表
[root@xcatmn ~]# chtab node=cpt01 nodetype.os=centos6.5 nodetype.arch=x86_64 nodetype.profile=compute nodetype.nodetype=osi
[root@xcatmn ~]# chtab node=cpt02 nodetype.os=rhels6u9 nodetype.arch=x86_64 nodetype.profile=compute nodetype.nodetype=osi
[root@xcatmn ~]# tabdump nodetype
#node,os,arch,profile,provmethod,supportedarchs,nodetype,comments,disable
"cpt01","centos6.5","x86_64","compute",,,"osi",,
"cpt02","rhels6u9","x86_64","compute",,,"osi",,
修改passwd表
[root@xcatmn rh]# chtab key=system passwd.username=root passwd.password=12345678aA
修改postscripts表
[root@xcatmn ~]#  chtab node=compute postscripts.postscripts="setupGang,reboot"
[root@xcatmn ~]#
[root@xcatmn ~]# tabdump postscripts
#node,postscripts,postbootscripts,comments,disable
"xcatdefaults","syslog,remoteshell,syncfiles,setupntp","otherpkgs",,
"service","servicenode",,,
"compute","setupGang,reboot",,,
为每个节点创建一个dhcp client
[root@xcatmn ~]# chtab key=dhcpinterfaces site.value='192.168.56.130|eth0'
[root@xcatmn ~]# makedhcp compute
[root@xcatmn ~]# service dhcpd restart
Shutting down dhcpd:                                       [  OK  ]
Starting dhcpd:                                            [  OK  ]
准备镜像
[root@xcatmn ~]# copycds CentOS-6.5-x86_64-minimal.iso
Copying media to /install/centos6.5/x86_64
Media copy operation successful
为节点挂载镜像,选择安装的操作系统
[root@xcatmn rh]# nodeset cpt02 osimage=rhels6u9-x86_64-install-compute
cpt02: install rhels6u9-x86_64-compute
[root@xcatmn rh]# nodeset cpt01 osimage=centos6.5-x86_64-install-compute
cpt01: install centos6.5-x86_64-compute
[root@xcatmn rh]# tabdump nodetype
#node,os,arch,profile,provmethod,supportedarchs,nodetype,comments,disable
"cpt01","centos6.5","x86_64","compute","centos6.5-x86_64-install-compute",,"osi",,
"cpt02","rhels6u9","x86_64","compute","rhels6u9-x86_64-install-compute",,"osi",,