1. about pypxe
项目地址:https://github.com/pypxe
这是比较牛逼的项目,居然自己实现了用于PXE的dhcp、tftp和http相应的功能,而且支持iPXE。
可惜只能支持Python2.7+,下面来试一下。
2. example
2.1 下载和安装
git clone https://github.com/pypxe/PyPXE.git
cd PyPXE
python setup.py install
2.2 启动服务
先来写一个需要的配置文件:
pypxe-netboot $ more example_cfg.json
{
    "DHCP_BROADCAST": "",
    "DHCP_DNS": "8.8.8.8",
    "DHCP_FILESERVER": "192.168.72.1",
    "DHCP_MODE_PROXY": false,
    "DHCP_OFFER_BEGIN": "192.168.72.100",
    "DHCP_OFFER_END": "192.168.72.150",
    "DHCP_ROUTER": "192.168.72.1",
    "DHCP_SERVER_IP": "192.168.72.1",       # DHCP服务器的IP地址,这个地址是hostonly的本机地址,等会用vm来测试
    "DHCP_SERVER_PORT": 67,
    "DHCP_SUBNET": "255.255.255.0",
    "DHCP_WHITELIST": false,
    "HTTP_PORT": 80,
    "LEASES_FILE": "",
    "MODE_DEBUG": "",
    "MODE_VERBOSE": "",
    "NBD_BLOCK_DEVICE": "",
    "NBD_COPY_TO_RAM": false,
    "NBD_COW": true,
    "NBD_COW_IN_MEM": false,
    "NBD_PORT": 10809,
    "NBD_SERVER_IP": "0.0.0.0",
    "NBD_WRITE": false,
    "NETBOOT_DIR": "netboot",        # tftp的根目录
    "NETBOOT_FILE": "",
    "STATIC_CONFIG": "",
    "SYSLOG_PORT": 514,
    "SYSLOG_SERVER": null,
    "TFTP_SERVER_IP": "192.168.72.1",   # tftp服务器地址
    "USE_DHCP": true,
    "USE_HTTP": false,
    "USE_IPXE": false,
    "USE_TFTP": true
}

pypxe-netboot $ pypxe  --config example_cfg.json
(<open file '<stderr>', mode 'w' at 0x6fffffe21e0>, '\nWARNING: Not root. Servers will probably fail to bind.\n')
2019-12-31 21:36:17,374 [INFO] PyPXE Starting TFTP server...
2019-12-31 21:36:17,382 [INFO] PyPXE Starting DHCP server...
2019-12-31 21:36:17,384 [INFO] PyPXE PyPXE successfully initialized and running!

# 这样就好了
2.3 安装测试
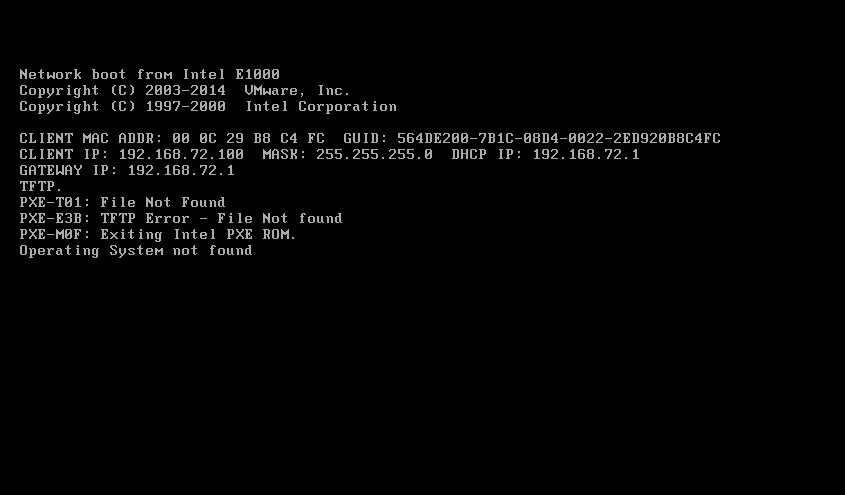
启动虚拟机,使用网络启动即可。

3. 网络安装一个Linux
# copy the config file
pypxe-netboot $ cp example_cfg.json /cygdrive/d/pypxe-netboot/
pypxe-netboot $ cp -r netboot /cygdrive/d/pypxe-netboot/
pypxe-netboot $ cat example_cfg.json
{
    "DHCP_BROADCAST": "",
    "DHCP_DNS": "8.8.8.8",
    "DHCP_FILESERVER": "192.168.72.1",
    "DHCP_MODE_PROXY": false,
    "DHCP_OFFER_BEGIN": "192.168.72.100",
    "DHCP_OFFER_END": "192.168.72.150",
    "DHCP_ROUTER": "192.168.72.1",
    "DHCP_SERVER_IP": "192.168.72.1",
    "DHCP_SERVER_PORT": 67,
    "DHCP_SUBNET": "255.255.255.0",
    "DHCP_WHITELIST": false,
    "HTTP_PORT": 80,
    "LEASES_FILE": "",
    "MODE_DEBUG": "dhcp",
    "MODE_VERBOSE": "",
    "NBD_BLOCK_DEVICE": "",
    "NBD_COPY_TO_RAM": false,
    "NBD_COW": true,
    "NBD_COW_IN_MEM": false,
    "NBD_PORT": 10809,
    "NBD_SERVER_IP": "0.0.0.0",
    "NBD_WRITE": false,
    "NETBOOT_DIR": "netboot",
    "NETBOOT_FILE": "boot.http.ipxe",
    "STATIC_CONFIG": "",
    "SYSLOG_PORT": 514,
    "SYSLOG_SERVER": null,
    "TFTP_SERVER_IP": "192.168.72.1",
    "USE_DHCP": true,
    "USE_HTTP": true,
    "USE_IPXE": true,
    "USE_TFTP": true
}

pypxe-netboot $ cat netboot/boot.http.ipxe
#!ipxe

:start
menu PXE Boot Options
item shell iPXE shell
item centos7 Install Centos7 from 192.168.72.1
item centos6 Install Centos6 from 192.168.72.1
item exit  Exit to BIOS

choose --default centos7 --timeout 5000 option && goto ${option}
:shell
shell


:centos7
set root http://192.168.72.1/centos7.iso
initrd ${root}/images/pxeboot/initrd.img
kernel ${root}/images/pxeboot/vmlinuz inst.repo=${root}/ initrd=initrd.img ip=dhcp
boot


:centos6
set httproot http://192.168.72.1
initrd ${httproot}/centos6.iso/images/pxeboot/initrd.img
kernel ${httproot}/centos6.iso/images/pxeboot/vmlinuz initrd=initrd.img  repo=${httproot}/ ksdevice=bootif ip=dhcp
boot


:exit
exit

pypxe-netboot $ tree netboot/
netboot/
├── boot.http.ipxe
├── boot.http.nbd.ipxe
├── boot.ipxe
├── centos6
├── centos6.iso -> /cygdrive/f
├── centos7
├── centos7.iso -> /cygdrive/e
├── chainload.kpxe
├── Core.iso
├── ldlinux.c32
├── ldlinux.e32
├── ldlinux.e64
├── libutil.c32
├── memdisk
├── menu.c32
├── pxelinux.0
├── pxelinux.cfg
│   └── default
├── syslinux.efi32
├── syslinux.efi64
└── win7pe.iso

3 directories, 18 files
pypxe-netboot $
pypxe-netboot $pypxe --config example_cfg.json
(<open file '<stderr>', mode 'w' at 0x6fffffe21e0>, '\nWARNING: Not root. Servers will probably fail to bind.\n')
2020-01-07 15:50:18,674 [INFO] PyPXE Starting TFTP server...
2020-01-07 15:50:18,684 [INFO] PyPXE Starting DHCP server...
2020-01-07 15:50:18,684 [DEBUG] PyPXE.DHCP NOTICE: DHCP server started in debug mode. DHCP server is using the following:
2020-01-07 15:50:18,684 [INFO] PyPXE.DHCP DHCP Server IP: 192.168.72.1
2020-01-07 15:50:18,684 [INFO] PyPXE.DHCP DHCP Server Port: 67
2020-01-07 15:50:18,684 [INFO] PyPXE.DHCP Lease Range: 192.168.72.100 - 192.168.72.150
2020-01-07 15:50:18,684 [INFO] PyPXE.DHCP Subnet Mask: 255.255.255.0
2020-01-07 15:50:18,684 [INFO] PyPXE.DHCP Router: 192.168.72.1
2020-01-07 15:50:18,685 [INFO] PyPXE.DHCP DNS Server: 8.8.8.8
2020-01-07 15:50:18,685 [INFO] PyPXE.DHCP Broadcast Address: 192.168.72.255
2020-01-07 15:50:18,685 [INFO] PyPXE.DHCP File Server IP: 192.168.72.1
2020-01-07 15:50:18,685 [INFO] PyPXE.DHCP File Name: http://192.168.72.1/boot.http.ipxe
2020-01-07 15:50:18,685 [INFO] PyPXE.DHCP ProxyDHCP Mode: False
2020-01-07 15:50:18,685 [INFO] PyPXE.DHCP Using iPXE: True
2020-01-07 15:50:18,685 [INFO] PyPXE.DHCP Using HTTP Server: True
2020-01-07 15:50:18,686 [INFO] PyPXE Starting HTTP server...
2020-01-07 15:50:18,687 [INFO] PyPXE PyPXE successfully initialized and running!
...
启动一个iso可以,但是进入到anconda中需要安装操作系统时候就会出现 Non-Pxe-client的提示,无法通过…
因为源码中说明了只实现针对PXE-Client的 Vendor-class:
    def validate_req(self, client_mac):
        # client request is valid only if contains Vendor-Class = PXEClient
        if self.whitelist and self.get_mac(client_mac) not in self.get_namespaced_static('dhcp.binding'):
            self.logger.info('Non-whitelisted client request received from {0}'.format(self.get_mac(client_mac)))
            return False
        if 60 in self.options[client_mac] and 'PXEClient' in self.options[client_mac][60][0]:
            self.logger.info('PXE client request received from {0}'.format(self.get_mac(client_mac)))
            return True
        self.logger.info('Non-PXE client request received from {0}'.format(self.get_mac(client_mac)))
        return False
而当CentOS7加载了vmlinuz和initrd之后会进入anaconda-linux进行系统安装,过程中会再次向DHCP服务器申请IP地址,
这个时候他向DHCP Server发出的discover申请是得不到回复的,因此安装过程将被打断。
另外,在使用ipxe的时候,如果没有重启pypxe服务,同一个客户端再次重启的时候,会出现TFTP服务器不能获得文件的情况,这应该是防止重复部署操作系统的问题。

x. 参考资料
- [1] https://github.com/pypxe
- [2] https://www.kutu66.com//GitHub/article_151637