1.准备工作
DP Server:
操作系统版本:windows server2008R2
DP版本:A.10.00
数据库服务器:
[root@db-server ~]# cat /etc/redhat-release
Red Hat Enterprise Linux Server release 6.4 (Santiago)
数据库信息:
export ORACLE_BASE=/u01/app/oracle
export ORACLE_HOME=$ORACLE_BASE/product/11.2.0/dbhome_1
export TMP=/tmp
export PATH=$PATH:$ORACLE_HOME/bin
export ORACLE_SID=test
数据库版本
Oracle Database 11g Enterprise Edition Release 11.2.0.4.0 - 64bit Production
上传安装介质到数据库服务器上:
localhost:backup$ scp HPE_DP_10.00_for_Linux_DP_A1000_GPLx86_64.tar.gz root@192.168.56.176:/root/
root@192.168.56.176's password:
HPE_DP_10.00_for_Linux_DP_A1000_GPLx86_64.tar 100% 2797MB  17.1MB/s   02:43
localhost:backup$
2.安装备份客户端
2.1 修改host表
Oracle 数据库服务器:
[root@db-server ~]# vim /etc/hosts
[root@db-server ~]# cat /etc/hosts
127.0.0.1   localhost localhost.localdomain localhost4 localhost4.localdomain4
::1         localhost localhost.localdomain localhost6 localhost6.localdomain6

192.168.56.176 db-server
192.168.56.160 backupserver
[root@db-server ~]# ping backupserver -c 2
PING backupserver (192.168.56.160) 56(84) bytes of data.
64 bytes from backupserver (192.168.56.160): icmp_seq=1 ttl=128 time=1.64 ms
64 bytes from backupserver (192.168.56.160): icmp_seq=2 ttl=128 time=0.695 ms

--- backupserver ping statistics ---
2 packets transmitted, 2 received, 0% packet loss, time 1001ms
rtt min/avg/max/mdev = 0.695/1.172/1.649/0.477 ms
备份服务器:
192.168.56.176 db-server
2.2 手动安装oracle集成客户端
[root@db-server ~]# tar -zxvf HPE_DP_10.00_for_Linux_DP_A1000_GPLx86_64.tar.gz
…
[root@db-server LOCAL_INSTALL]# yum install xinetd -y
[root@db-server LOCAL_INSTALL]# chkconfig xinetd on
[root@db-server LOCAL_INSTALL]# service xinetd restart
Stopping xinetd:                                           [FAILED]
Starting xinetd:                                           [  OK  ]
[root@db-server LOCAL_INSTALL]# pwd
/root/DP_A1000_GPLx86_64/LOCAL_INSTALL
# 安装da 和 oracle 两个包
[root@db-server LOCAL_INSTALL]# ./omnisetup.sh -install da
[root@db-server LOCAL_INSTALL]# ./omnisetup.sh -install oracle8
…
Data Protector software package successfully installed
  Client was not imported into the cell.
  Please, perform the import manually by following the steps below.
    step1: Configure the cell manager by running /opt/omni/bin/omnicc -secure_comm -configure_peer <Cell Server> from this host.
    step2: Perform the import manually from cell manager or from one of the other clients of the cell.

  Installation/upgrade session finished.
#和备份服务器添加配对关系
[root@db-server LOCAL_INSTALL]#  /opt/omni/bin/omnicc -secure_comm -configure_peer backupserver
 - Please use the fingerprint to validate the certificate manually!
Certificate information:
 - Hostname:backupserver
 - Valid: from Jan  3 15:39:57 2018 GMT until Jan  1 15:39:57 2028 GMT
 - Fingerprint: 31:ee:88:39:fb:4a:78:06:3b:d7:0c:b1:fd:00:c3:20:1c:5d:ba:76:e6:5c:89:ff:92:83:b1:61:58:f0:f9:61
Do you want to continue (y/n)?y
Host 'backupserver' configured for secure configuration successfully.
2.3 在备份软件界面中配置客户端
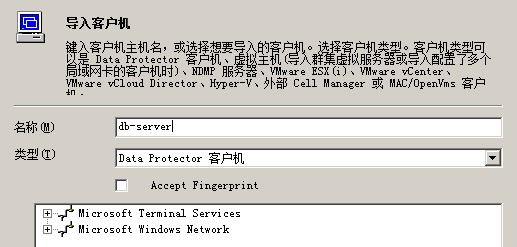
在“导入”界面点击“导入客户机”:

输入“db-server”名称,需要与hosts文件中一致

关闭客户端的防火墙或者配置相应端口开放:
[root@db-server LOCAL_INSTALL]# service iptables stop
iptables: Flushing firewall rules:                         [  OK  ]
iptables: Setting chains to policy ACCEPT: filter          [  OK  ]
iptables: Unloading modules:                               [  OK  ]
[root@db-server LOCAL_INSTALL]# chkconfig iptables off
接受证书,点击“确定”:

至此完成客户端的配置。
2.4 配置oracle数据库的归档模式
# 查看归档模式,disabled
SQL> archive log list
Database log mode              No Archive Mode
Automatic archival             Disabled
Archive destination            /u01/app/oracle/product/11.2.0/dbhome_1/dbs/arch
Oldest online log sequence     2
Current log sequence           4
SQL>
SQL>
SQL> select name,log_mode from v$database;

NAME      LOG_MODE
--------- ------------
TEST      NOARCHIVELOG

# 关闭数据库
SQL> shutdown immediate;
Database closed.
Database dismounted.
ORACLE instance shut down.
# 启动到mount状态
SQL> startup mount
ORACLE instance started.

Total System Global Area  839282688 bytes
Fixed Size                  2257880 bytes
Variable Size             545262632 bytes
Database Buffers          289406976 bytes
Redo Buffers                2355200 bytes
Database mounted.
# 打开归档模式
SQL> alter database archivelog;

Database altered.
# 打开数据库
SQL> alter database open;

Database altered.
# 查看归档模式:enabled
SQL> archive log list;
Database log mode              Archive Mode
Automatic archival             Enabled
Archive destination            /u01/app/oracle/product/11.2.0/dbhome_1/dbs/arch
Oldest online log sequence     2
Next log sequence to archive   4
Current log sequence           4
2.5 配置oracle数据库的备份
在“备份”界面,点击“Oracle Server”来“添加备份”:

选择“空白oracle备份”或者其他备份方式:

指定客户机名称:db-server 执行数据库名称:test 用户名:oracle,这个用户需要在DP软件“用户管理”中添加进去 组:dba

填写oracle_home路径:

填写数据库用户名和密码,主要需要使用sysdba的用户,如sys,其中服务名一般为数据库名,可以使用show parameter service查看。

选择备份内容,这里讲所有内容进行备份

选择备份目标位置,这里使用配置好的media-2

完成配置。
3.备份恢复测试
3.1 备份测试
在“备份”界面,点击刚才完成的“备份”,开始备份,即可在“监控器”中看到刚才的备份。如果是定时备份的话,在备份期间,也可以在“监控器”中看到。 这里已经备份完成了。

3.2 恢复测试
修改一下数据库
SQL> create user user001 identified by oracle;
User created.
SQL> grant connect,resource,dba to user001;
Grant succeeded.
SQL> create table user001.t1 as select * from dba_source;
Table created.
SQL> desc user001.t1
 Name                                      Null?    Type
 ----------------------------------------- -------- ----------------------------
 OWNER                                              VARCHAR2(30)
 NAME                                               VARCHAR2(30)
 TYPE                                               VARCHAR2(12)
 LINE                                               NUMBER
 TEXT                                               VARCHAR2(4000)
SQL> commit ;
Commit complete.
再备份一次

破坏数据库,这里删除了数据库的所有数据文件
SQL> select name from v$datafile;

NAME
--------------------------------------------------------------------------------
/u01/app/oracle/oradata/TEST/datafile/o1_mf_system_f51j89no_.dbf
/u01/app/oracle/oradata/TEST/datafile/o1_mf_sysaux_f51j89ol_.dbf
/u01/app/oracle/oradata/TEST/datafile/o1_mf_undotbs1_f51j89oq_.dbf
/u01/app/oracle/oradata/TEST/datafile/o1_mf_users_f51j89p9_.dbf
SQL> exit
Disconnected from Oracle Database 11g Enterprise Edition Release 11.2.0.4.0 - 64bit Production
With the Partitioning, OLAP, Data Mining and Real Application Testing options
[oracle@db-server ~]$
[oracle@db-server ~]$ ll /u01/app/oracle/oradata/TEST/datafile/
total 1455176
-rw-r-----. 1 oracle oinstall 534781952 Jan  6 22:33 o1_mf_sysaux_f51j89ol_.dbf
-rw-r-----. 1 oracle oinstall 775954432 Jan  6 22:33 o1_mf_system_f51j89no_.dbf
-rw-r-----. 1 oracle oinstall  30416896 Jan  6 21:35 o1_mf_temp_f51jcc4f_.tmp
-rw-r-----. 1 oracle oinstall  78651392 Jan  6 22:33 o1_mf_undotbs1_f51j89oq_.dbf
-rw-r-----. 1 oracle oinstall  99622912 Jan  6 22:33 o1_mf_users_f51j89p9_.dbf
[oracle@db-server ~]$ rm /u01/app/oracle/oradata/TEST/datafile/*
[oracle@db-server ~]$ ll /u01/app/oracle/oradata/TEST/datafile/
total 0
因为控制文件完好,所以将数据库启动到mount状态
SQL> shutdown abort;
ORACLE instance shut down.
SQL> startup mount;
ORACLE instance started.

Total System Global Area  839282688 bytes
Fixed Size    2257880 bytes
Variable Size  545262632 bytes
Database Buffers  289406976 bytes
Redo Buffers    2355200 bytes
Database mounted.
SQL>
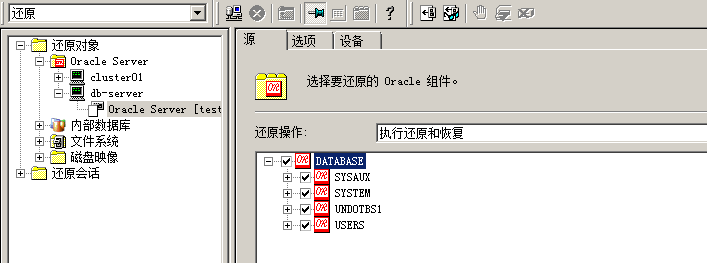
执行还原 数据文件受损,需要执行restore和recover,并选择所有表空间:

手动填写用户名和用户组

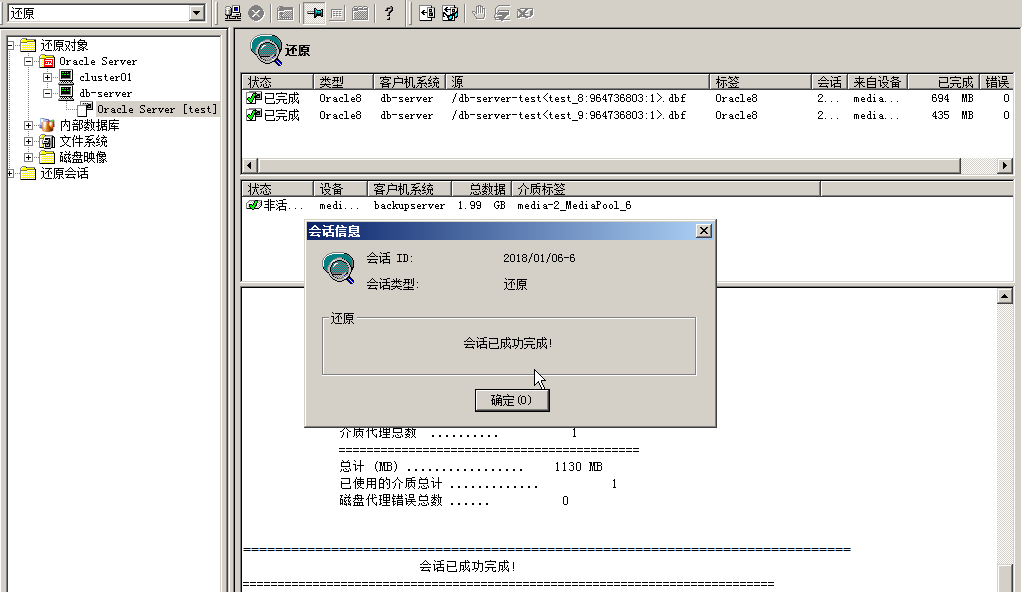
开始执行还原,默认完成后直接打开数据库

验证一下,数据库打开了,而且之前创建的表也回来了。
SQL> select status from v$instance;

STATUS
------------
OPEN
SQL> select count(*) from user001.t1;

  COUNT(*)
----------
    636842