上一篇通过jhalfs脚本已经创建了一个简单的LFS-Linux,但是内容太少,需要用于测试环境都不足,还需要做一些其他配置。
1. 配置IP地址
使用systemd来管理网络服务,为systemd-networkd.service 。
网络设备的Network文件必须以
.network作为后缀名,否则将被忽略。 一旦与Network文件匹配的网卡出现,对应的Network文件就会立即生效。
这个配置文件的存放位置为:
- 系统网络目录(
/usr/lib/systemd/network) - 运行时网络目录(
/run/systemd/network) - 本机网络目录(
/etc/systemd/network)
所以,.network的文件放置与/etc/systemd/networkd下面。具体说来就是:/etc/ 的优先级最高、 /run/ 的优先级居中、/usr/lib/ 的优先级最低。
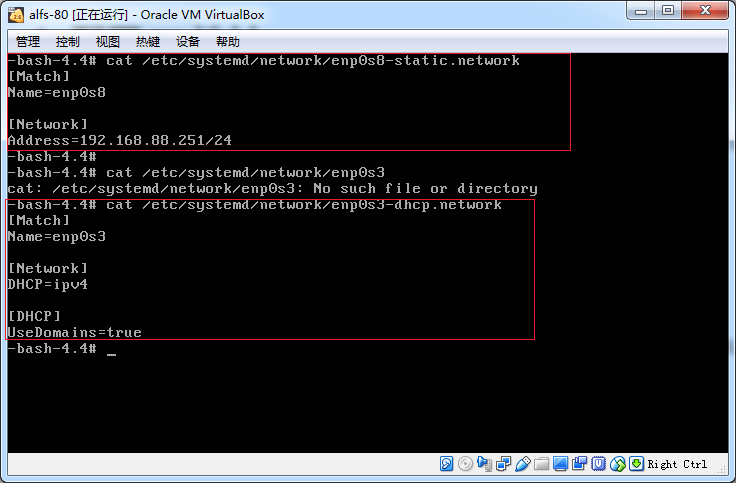
来增加两个配置文件

重启网络服务,即可
systemctl restart systemd-networkd.service
上面涉及的网络配置文件的语法和说明可以参考http://www.jinbuguo.com/systemd/systemd.network.html。
2. wget工具
通过上面的配置就已经可以上网了,但是没有一个下载文件的工具,其他的软件包还是无法安装其他软件。因此,先下载一个wget工具吧。下载路径均在BLFS中查看。
GNU Wget is a free utility for non-interactive download of files from the Web. It supports HTTP, HTTPS, and FTP protocols, as well as retrieval through HTTP proxies.
2.1 下载wget
先用其他机器下载下来,再拷贝进去
wget https://ftp.gnu.org/gnu/wget/wget-1.19.4.tar.gz
wget https://openssl.org/source/openssl-1.0.2k.tar.gz  # wget 依赖openssl
2.2 安装openssl
OpenSSL is a cryptography toolkit implementing the Secure Sockets Layer (SSL v2/v3) and Transport Layer Security (TLS v1) network protocols and related cryptography standards required by them.
OpenSSL是实现安全套接字层(SSL v2/v3)和传输层安全(TLS v1)的工具。
# 解压
tar -zxf openssl-1.0.2k.tar.gz
# 编译
./config --prefix=/usr         \
         --openssldir=/etc/ssl \
         --libdir=lib          \
         shared                \
         zlib-dynamic &&
make depend           &&
make -j1
# 安装
make MANDIR=/usr/share/man MANSUFFIX=ssl install &&
install -dv -m755 /usr/share/doc/openssl-1.0.2k  &&
cp -vfr doc/*     /usr/share/doc/openssl-1.0.2k
2.3 安装wget
# 解压
tar -zxf wget-1.19.4.tar.gz
# 编译&&安装
./configure --prefix=/usr      \
            --sysconfdir=/etc  \
            --with-ssl=openssl &&
make && make install
3. 配置sshd服务
默认的LFS是没有安装ssh服务的,有了sshd服务,管理起来当然更加舒坦。
参考BLFS可以查到需要openssh需要安装,http://www.linuxfromscratch.org/blfs/downloads/stable/BLFS-BOOK-8.2-nochunks.html#openssh。
3.1 准备ssh相关软件包
下载软件包
wget http://ftp.openbsd.org/pub/OpenBSD/OpenSSH/portable/openssh-7.4p1.tar.gz
Openssh是依赖OpenSSL-1.0.2k包的,再后续版本中也可以不依赖,只安装一个补丁包即可。
3.2 安装软件包
install  -v -m700 -d /var/lib/sshd &&
chown    -v root:sys /var/lib/sshd &&
groupadd -g 50 sshd        &&
useradd  -c 'sshd PrivSep' \
         -d /var/lib/sshd  \
         -g sshd           \
         -s /bin/false     \
         -u 50 sshd
./configure --prefix=/usr                     \
            --sysconfdir=/etc/ssh             \
            --with-md5-passwords              \
            --with-privsep-path=/var/lib/sshd &&
make &&

make install &&
install -v -m755    contrib/ssh-copy-id /usr/bin     &&

install -v -m644    contrib/ssh-copy-id.1 \
                    /usr/share/man/man1              &&
install -v -m755 -d /usr/share/doc/openssh-7.4p1     &&
install -v -m644    INSTALL LICENCE OVERVIEW README* \
                    /usr/share/doc/openssh-7.4p1
# 下载blfs
wget http://www.linuxfromscratch.org/blfs/downloads/8.0/blfs-systemd-units-20160602.tar.bz
# 解压后进入目录:
make install-sshd
# 启动sshd服务
systemctl start sshd.service
还需要改下参数
-bash-4.4# cat /etc/ssh/sshd_config |grep PermitRoot
#PermitRootLogin prohibit-password
PermitRootLogin yes   # 改成这个
这下可以使用CRT或者xshell或者putty等喜欢的工具进行管理LFS-Linux了。
4. python & pip工具
查看python3,python3依赖libffi-3.2.1。
下载python3
-bash-4.4# wget https://www.python.org/ftp/python/3.6.0/Python-3.6.0.tar.xz --no-check-certificate
下载libff
wget ftp://sourceware.org/pub/libffi/libffi-3.2.1.tar.gz
安装libff
sed -e '/^includesdir/ s/$(libdir).*$/$(includedir)/' \
    -i include/Makefile.in &&

sed -e '/^includedir/ s/=.*$/=@includedir@/' \
    -e 's/^Cflags: -I${includedir}/Cflags:/' \
    -i libffi.pc.in        &&

./configure --prefix=/usr --disable-static &&
make && make install
安装python3
CXX="/usr/bin/g++"              \
./configure --prefix=/usr       \
            --enable-shared     \
            --with-system-expat \
            --with-system-ffi   \
            --with-ensurepip=yes &&
make &&
make install &&
chmod -v 755 /usr/lib/libpython3.6m.so &&
chmod -v 755 /usr/lib/libpython3.so
# mk a soft link
cd /usr/bin && ln -s python3 python
下载pip
wget https://bootstrap.pypa.io/get-pip.py
安装pip
-bash-4.4# python get-pip.py
-bash-4.4# pip --version
pip 18.0 from /usr/lib/python3.6/site-packages/pip (python 3.6)
下面就可以使用pip随意创建python开发环境了。
参考
- http://www.jinbuguo.com/systemd/systemd.network.html
- http://www.linuxfromscratch.org/blfs/downloads/stable/BLFS-BOOK-8.2-nochunks.html